A busy, disorganised-organised Mamma who loves to scrap …. Sharing my family's journey in my beginner-level scrapbooking creations while creating a conversation about Mummy-hood in modern day busy times, sharing creative tips for beginner scrappers and Mummy-scrappers, and generally spreading positivity about family relationships in trying times.
This is the story about a Mamma-scrapper (me) who really, really wanted to make a scrapbook page with the ultrasound printouts which always seem to live in a “baby box” somewhere. I also had some really cute little 6×6″ papers from an American CraftsAmy Tangerine “Plus One” paper pad … but they were so cute, I didn’t want to cut them. I wanted to show them off as much as possible.
I’m getting ahead of myself though…
The story starts back in January 2015. Our precious little baby #3 was just 8 months old and I found out we were unexpectedly-expecting baby #4. I actually didn’t get the courage to tell my husband for a whole week … and only managed to blurt it out when he stumbled across the first ultrasound picture on the page showing I was already 8 weeks along. Oops. So whilst little miss baby #4 is extremely well loved today and is nothing short of a ray of joyful sunshine in our lives …. we spent most of 2015 being somewhat freaked out at being caught so unawares.
So that explains the title of this scrapbooking page. I hope.
As with most of my projects, I started by going through my incredibly immense stash and put together a collection of various pieces that coordinated with my choice of papers. A kind-of “Mood Board”, which in actual fact was just a smeared sea of pink, yellow, and black across my craft desk.
A black cardstock background was the best way to make the lovely bright colours from the printed papers really stand out, and from there I chose a natural hessian stick-on flower I picked up at a local $2 store (there were 6 in the pack and they appear in a few of my projects) … a printed polaroid frame from Pink Paislee “Secret Crush” collection … A wooden bird from Kaisercraft which I left raw … some random washi tape … some yellow enamel dots from the Snap Life Documented collection … and a chipboard heart flourish from Australian company Words or Whatever.
Our Little Surprise … an otherwise black and white layout is spiced up with pops of loud pink and yellow … featuring American Crafts Amy Tangerine “Plus One” 6×6 Papers and a Chipboard Heart Flourish from Words or Whatever
The chipboard heart flourish was coated first with some basic white Gesso from my local $2 store. Then I painted over it with Viva Decor Precious Metal paint in a pink shade. I also added some Kaisercraft rhinestones to bling it up a bit for my little princess-to-be.
The alpha stickers are a mix of American Crafts Thickers (in two different pink designs) and some alphas taken from an old BoBunny Press collection. I also added a “Precious” definition rub-on from Kaisercraft to finish it off. The word “love” was already printed on the pink paper square and I just traced around it with a black fine tip pen.
It’s important to let those little things you really love in your collection …. like a certain photo, or pieces of paper like I have here …. guide how you structure your page. I really loved these patterned papers and it was the key driver behind my layout. These pages you create are memories. They are designed to be looked back on in years to come. They don’t have to look perfect … they just have to look meaningful to you and bring you joy both during and after their creation. So that’s why you want to make sure your favourite pieces, the things you really love the most, take centre stage. You will love them all the more when you open up your scrapbooks again and thumb through them.
Once again, I do prefer my fairly simple & uncluttered style of scrapbooking. I’m sure the professional bloggers could have layered this page up so that it wound up weighing roughly the same as my precious newborn …. but beginners should find these kind of clean lines refreshingly easy to emulate in their own crafty corner. The layering can come later if you so desire.
Remember also (beginners out there) that you want to see a “Z” and TRIANGLES across your page. Here, you can see a Z if you start from the top left corner, go across right, down diagonally left through the “love” and chipboard heart in the middle, and back right again through the ‘surprise’ title. There is a triangle formed with the hessian flower, bird, and heart elements. And there is also harmony in the balance of the “love” word outlined in the middle of the 4 photos square. These Z’s and Triangles indicate balance and flow in your layout.
Ok so I’m the first to admit … this style of scrapbooking may not be 100% “new” as of the date of this post in February 2016. However, it’s certainly a new discovery for ME. And I’m loving it!! It is absolutely perfect for the modern busy Mamma and they represent a lovely connection between old style photo albums and contemporary scrapbooking styles.
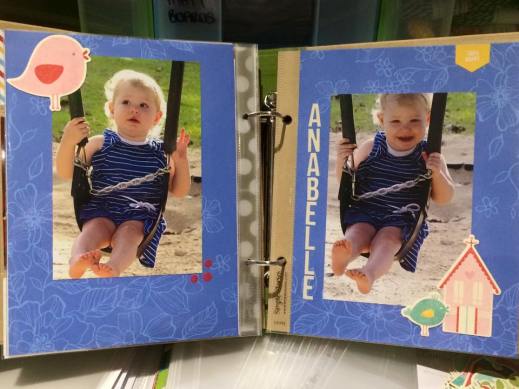
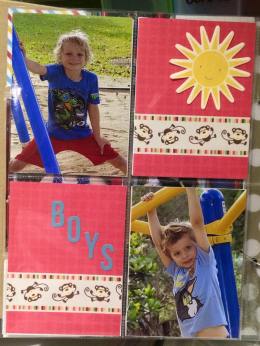
I’m referring to the “pocket pages” method of scrapbooking, which uses clear plastic inserts and binders in all shapes, colours, styles and sizes. Not only do they look great, no matter whether you’re a beginner or a seasoned pro … they are incredibly easy to use (foolproof even), you can vary your level of ‘adornment’ (lots of embellishments or just the bare minimum), they are easy to store, easy and interesting to flip through, and …. the biggest PLUS yet …. there are all kinds of ready-made, pre-cut, “pop them out of the packet and whack them straight in” paper pieces you can buy to make the whole process even simpler. You could almost literally put these together with your eyes shut and still make a fantastic looking album.
That’s not to say that these albums are so easy that they’re just not fun. They are. Besides, the fun is always up to you. Everyone has their own reasons for finding scrapbooking fun. For me, it’s the memories I’m reliving while I scrap my favourite photos and write my journaling …. it’s the pride I feel in creating something that my children (or grandchildren!) will hopefully one day cherish …. and it’s the feeling of satisfaction I get when I create something that looks nice and I sit down to show my husband and kids what I’ve made to a collective muddle of impressed exclamations and flagrant disinterest depending on the prevailing winds that dictate childhood moods.
One of my favourite pages so far
So what exactly is involved in making these albums?There are a lot of different options. Personally, as I was just venturing into scrapbooking after years of hoarding materials and tools, I wanted something smaller than the traditional 12×12 page size. So I chose a 6×8 inch album from Simple Stories. I saw it on sale with a smooth kraft finish and green binding and I was hooked in. However there are 12×12 albums and inserts available as well. I’ll probably step up to those in the future (after all, I’ve got about 50 or so 12×12 Kaisercraft binders around here somewhere left over from my craft website store days!) but for now I love the training ground that the 6×8 size provides me.
Once you start having a look at everything that’s available, you will notice that the pocket sizes range as follows: 2×2, 3×3, 3×4, 4×4, 4×6 (standard photo size) and 6×8 in the smaller size albums, plus 2×6 border strips; with the larger albums also containing bigger sizes such as 6×12 and 12×12. There are dozens of variations in the template configurations for the plastic sleeve inserts. I personally found mixed packs to be the best bargain, particularly to get started; and the ability to mix photo sizes and use many photos in each page layout as opposed to just one or two was yet another lure that tipped the scales in favour of pursuing this form of scrapbooking.
Keep in mind that many items you might purchase are one-off buys, which will last you either forever or at least a long time, or a number of projects, or until my kids get hold of them and pull them apart (does anyone else have the continuous problem with toddlers dismantling their tape runners?). Here is my list of things you will probably need when making these albums (note that I have ignored any everyday scrapbooking items like scissors, glue/tape, pens and a self-healing craft mat):
I love these 6×8 kraft binders from Simple Stories – with bonus inserts provided to get you started! Photo courtesy of http://www.simplestories.com
Binders (many come with some basic inserts). The binder size you choose will dictate the inserts and possibly the scale of other accessories you utilise. For smaller albums you will need to focus on smaller scale embellishments as more often than not over-sized decorations just won’t have a place on the page.
Plastic page inserts – a mixed selection of templates/configurations is good.
Packs of Pre-Cut Cardstock Inserts – Plain ruled cards are a good basic, and any other packs or themes that take your fancy. They can often feature basic patterns, quotes, foil finishes, glitter, pictures, words, textures, borders or plain cardstock colours.
Stickers – Because you generally want the photos etc inside the pockets to lay flat, stickers are perfect embellishments. Get a good selection of washi tape stickers, alphas (big & small), words, geo dots, tags, etc. After I started this form of scrapbooking I found myself stocking up on a lot of stickers, especially alphas in all shapes, sizes and colours.
Rhinestones & Enamel Dots
Photo Crops – Again, I like the Simple Stories brand angled side crops (as opposed to the round ones – I have a circle cutter for that).
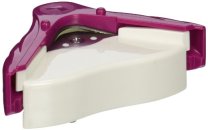
Photo Corner Rounder – I absolutely love mine. It is one of the most simple tools I think I’ve ever used and makes perfect round corners without even trying. I recommend getting a medium (10mm) and a large as pictured.
Other Embellishments that work well: Flairs, Twine, Flowers (flat are generally best), Kaisercraft Sparklets, Stamps, Buttons, Paper pieces generally, Photo overlays, Ribbon, Rub-Ons, Journaling Cards, Chipboard or Cardstock Shapes (such as Kaisercraft Collectables or BoBunny Noteworthy) and similar.
Some additional pointers relating to these binder scrapbooks:
They are perfect for beginners. I would suggest starting small as a way to get started.
This style of scrapbooking becomes even quicker and easier for the busy Scrappy Mamma if you have a decent colour printer at home. It is not necessary to spend a fortune and I’m sure I will blog about this particular topic in the future, but something that will print decent quality photos at home rather than running all over town to get them done can save a lot of time and make it easier to get some scrappy time for yourself as it requires no forward planning.
Embellishments : Go light, or go heavy, it’s up to you! (and your budget/schedule/personal taste)
Let yourself outside of the box. These little pages are a great way to experiment with colours, collections, embellishments and other things that take your fancy. So often we get put inside a trendy little ‘box’ when trying to emulate what we see in craft magazines and on the more accomplished bloggers’ sites. You are not restricted to a single colour palette, or paper collection, for any single binder. Pick a broad theme and run with that. For example, my first binder was all about family activities that we do together …. that’s how I grouped the photos but after that it was free reign. Different colours, different collections, a variation in embellishments and techniques used, and it still looks fabulous.
When selecting your plastic inserts, remember that the template you choose has both a front side and a back side that need to be filled. It’s important to choose the right one to compliment and fit all of the photos you want to include in a particular section.
Each pocket in the plastic inserts is obviously limited in its capacity. It forces us to move away from the current “trendy” scrapbooking technique of layering, layering, layering because the pieces will simply become too thick to fit into the pocket. If you’re just starting out, then try keeping it clean and simple.
At some point in the near future I will do a blog outlining the steps I personally take to do a project. Sometimes it can be helpful to know where to even start.
I will point out that there are a LOT of brands on the market which have released their own lines of ‘pocket page’ scrapbooking products. A few that are my own favourites and seem to me to be the leading products in the field:
Simple Stories Snap (or Sn@p) – my personal favourite, it features in a lot of my first projects.
Me & My Big Ideas (‘Mambi’) Pocket Pages – I love their quotes and glitter/foil finishes.
Becky Higgins Project Life – Especially good when you want larger collections of coordinating pieces.
We R Memory Keepers Albums Made Easy
Kaisercraft Captured Moments – I’ve just started getting a few of these, and so far they are really good although they seem to focus on just 2 sizes for now.
October Afternoon Daily Flash – Love the old school feel of this brand.
Plus any papercraft brands that have ‘elements’ or similar box shape cutout pages like this one pictured below from BoBunny Press:
BoBunny “Head over Heels” collection paper – an example of box square cutouts that have been included on scrapbooking papers for years and which are perfect for this ‘pocket pages’ style of scrapbooking
Whilst all of these brands are fantastic, and provide a great opportunity to purchase coordinating items as a package … don’t feel like you’re limited to searching for these pre-cut and coordinating items in your scrapbooking supply haunts. You can literally use any items and just cut it to size with a standard cutter, and even round the edges with your corner rounder (see my list of must-have items above). Many of my projects have mixed and matched all kinds of products – in fact I’m quite sure that none of my projects so far have used any single collection or ‘matched set’ as will likely become evident as my blog progresses and shares them.


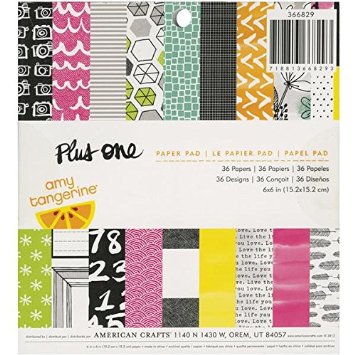 Amy Tangerine “Plus One” paper pad … but they were so cute, I didn’t want to cut them. I wanted to show them off as much as possible.


 mixed packs to be the best bargain, particularly to get started; and the ability to mix photo sizes and use many photos in each page layout as opposed to just one or two was yet another lure that tipped the scales in favour of pursuing this form of scrapbooking.


You must be logged in to post a comment.